We made this as part of our "food as a present" idea - since we started to cook and bake our way around the world, we have so much cake in the house, we need to share it! So, these coconut ice cubes, we made to give away.
We used:
- 1x 400g tin of evaporated milk
- 400g icing sugar
- around 330g of desiccated coconut (we say "around", we had a packet, which was 200g, then a "rest of a packet", which was maybe 40g, that made the texture too sticky, and when Mummy looked in a panic to see what we could use, we found another half-used packet of desiccated coconut, and threw in enough so the mixture handled like a dough. You see, we are well prepared and think everything through!)
- a few drops of red food colouring (optional)
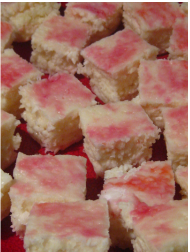
Mix the evaporated milk, icing sugar and coconut in a bowl until you have a dough (tip, the longer it "sits" or the warmer it gets, the stickier it gets). Divide in two and work a few drops of red food colouring into one half (possibly better than we did, unless you like the mottled look). Cover a work surface with cling film, dust both film and rolling pin with icing sugar (frequently, in the case of the rolling pin!) and roll one half of the dough into a...well, oval. Repeat with the other half, so you have two separate, rolled out shapes (preferably the same kind of shape). Flip one so it's on top of the other, and roll with a rolling pin a couple of times (we liked doing this with the cling film still attached, it made it easier. You are now supposed to have a two-toned oval, roughly an inch thick. If, like us, you have something a lot thinner (oops!), peel off the cling film, fold in half and gently roll out again to make the folded bits stick to each other.
Leave uncovered for several hours (we waited five), then cut into cubes. They'll still be a bit sticky from the other side, so flip them over and leave to dry a bit more. Feel free to nibble on off-cuts as you go along. Enjoy!
We used:
- 1x 400g tin of evaporated milk
- 400g icing sugar
- around 330g of desiccated coconut (we say "around", we had a packet, which was 200g, then a "rest of a packet", which was maybe 40g, that made the texture too sticky, and when Mummy looked in a panic to see what we could use, we found another half-used packet of desiccated coconut, and threw in enough so the mixture handled like a dough. You see, we are well prepared and think everything through!)
- a few drops of red food colouring (optional)
Mix the evaporated milk, icing sugar and coconut in a bowl until you have a dough (tip, the longer it "sits" or the warmer it gets, the stickier it gets). Divide in two and work a few drops of red food colouring into one half (possibly better than we did, unless you like the mottled look). Cover a work surface with cling film, dust both film and rolling pin with icing sugar (frequently, in the case of the rolling pin!) and roll one half of the dough into a...well, oval. Repeat with the other half, so you have two separate, rolled out shapes (preferably the same kind of shape). Flip one so it's on top of the other, and roll with a rolling pin a couple of times (we liked doing this with the cling film still attached, it made it easier. You are now supposed to have a two-toned oval, roughly an inch thick. If, like us, you have something a lot thinner (oops!), peel off the cling film, fold in half and gently roll out again to make the folded bits stick to each other.
Leave uncovered for several hours (we waited five), then cut into cubes. They'll still be a bit sticky from the other side, so flip them over and leave to dry a bit more. Feel free to nibble on off-cuts as you go along. Enjoy!
 RSS Feed
